Code Your Transcript
Add Tags/Codes to Your Transcript Spreadsheet (Optional)
If you’d like to enable subject-based browsing and color-coded visualizations for your transcript, you need to “code” portions of the conversation according to the subject matter.
Your Instructor(s) should have developed a basic list of codes for your class project already, either with you and your class or on their own. Use those tags already developed to code chunks of your interview transcript. ,
- To do this, you will re-read your transcript carefully and start adding “tags” to the
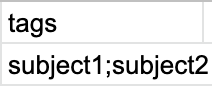
tagscolumn–- tags are shorthand descriptions of larger thematic subjects that pertain to this and other transcripts in a collection.
- They correspond to the descriptions provided in a
filters.csvfile that your instructor or your class will have already developed. - You will add them in the cells under the “tags” column that pertain to the content in the adjacent “words” cell.
-
If you have multiple subjects in a cell, separate them with a semi-colon (as pictured above).
-
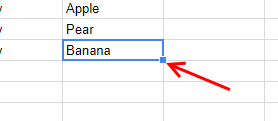
You’ll often want to cover a large portion of the transcript with the same tags. In Google Sheets, you can do this by hovering over the bottom right of a cell (pictured below) and then dragging your cursor across the pertinent sections of the transcript below or above where you started.
- This saves a great deal of time, as usually sections of the oral history are all pertaining to the same tags/subjects.
See a finished transcript: You can check out what a finished transcript looks like in this Sample Google Sheet