Topic Modeling
Goals: Write in Markdown; name topics; view topic visualizations; add a topic graph to essay
Estimated Time to Complete: 1 hour + 30 minutes
Now that your project site is set up, we’re going to learn how to add content to your essay and how to visualize topics in our 20th-century State of the Union Address and Party Platform corpora.
This lesson will likely take a bit longer than your other Labs. But you’ll be using the skills you learn in this Lab in most of your future Labs from now on, so even if you don’t feel completely comfortable with the concepts you’re learning here by the end of this lesson, you’ll continue practicing them in future Labs and as you write your essays, and hopefully gain confidence as you continue to use them.
Step 1. Navigate to your project repository
- Log in to GitHub (https://github.com).
- Once you’re logged in, select the dropdown arrow in the very top-right corner of your browser window. Once you select this, a dropdown list should appear that starts with the words “Signed in as [your username].” On the dropdown, locate the link titled “Your repositories” and click on it. This will take you to your GitHub account and a list of all the repositories you’ve ever created.
- Locate the name of the repository you created last week, and click on it. This will bring you to your project repository and website, where you can continue editing files following the steps below.
Step 2. Open your website in a new browser tab or window
- In the “About” section of your repository homepage (the section to the right of the green “Code” button), locate the URL for your project site. Right click this URL and select either “Open link in new tab” or “Open link in new window.”
- Now you should have two tabs/windows open: one with your GitHub repository (the “back end” of your site) and one with your website (the “front end” of your site). You’ll need both of these tabs/windows open for the duration of this Lab, and you’ll work with both of them open in future Labs.
Step 3. Practice adding text content to your essay page
- While viewing your website, click on the “Essay In Progress” link in the navigation menu. This should take you to a page titled “My Essay Title.” Scroll down this page, taking note of the different heading styles, font styles, bullet point lists, images, pdfs, and citations.
- To edit the content on this page, go back to the tab/window that contains your GitHub repository.
- In your GitHub repository, locate and click on the “pages” folder.
- Inside the “pages” folder, click on the file titled “essay-01.md.” Then select the pencil button in the top right corner of the
essay-01.mdfile to open editing mode.
- Once in editing mode, at the very top of the file, you’ll see the following:
---
title: Essay 1
layout: about
permalink: /essay-01.html
---
This little grouping of text is called “frontmatter.” It must be left exactly as it is for your site to work correctly, so don’t change it!. Just ignore it, and skip to the line of text below it that says
# My Essay Title.
Remember your “Essay In Progress” page that we just looked at?
It was also titled “My Essay Title”!
That’s because the essay-01.md file is the “back end” for the “Essay In Progress” webpage.
In other words, when you write content into the essay-01.md file, that content will show up on the “Essay In Progress” page on your website.
You’ll notice that the content currently in essay-01.md is formatted in a way that’s probably different from what you’re used to.
This is because this content is written in a format called “Markdown.”
Markdown was developed as a simple way to write content for the web without using HTML (hyptertext markup language), a language commonly used to write content for websites.
We’re using Markdown for your essays because it is much simpler than HTML, yet it will still allow you to easily incorporate images, pdfs, and visualizations into your essays.
Markdown is very similar to the way you write and format content in Microsoft Word documents, with a few key differences:
Headings
Headings are used to title a section in your essay, and are indicated with one or more pound signs (#) in front of them.
One # indicates the largest heading: Heading One. For example:
# Heading One in your essay-01.md will look like:
Heading One
on your “Essay In Progress” webpage.
You can make smaller headings, too:
Two ## indicates heading two, which is slightly smaller than heading one:
Heading Two
Three ### indicates heading three, and so on.
Now try it yourself
- In your
essay-01.mdfile, replace the words in the first heading# My Essay Titlewith a new title for your essay (note, this doesn’t have to be what you officially title your essay, it can be anything you want right now, this is just practice). Make sure you include one#in front of your essay title, like this:# My New Essay Title. - After you’ve added a new title to your
essay-01.mdfile, scroll down to the bottom of the file and type a commit message into the “Commit changes” text box. - Click the green “Commit changes” button to save your changes.
- Head over to where you opened your “Essay In Progress” page in a different tab or window.
- Wait a minute or two, then refresh the “Essay In Progress” page.
- Once you refresh your site, you should see your new title displayed where “My Essay Title” used to be.
- The updates may take a few seconds to a few minutes to appear, so hold tight and keep refreshing if you don’t see them right away.
You’ll notice that # My Essay Title doesn’t appear with a # in front of it on your actual website.
This is because the computer translates it into the appropriate code, so that it appears as a large title on your page, without displaying the # that you added on the back end.
Now that you’ve seen how the back end is translated into the front end of your website, you can continue to learn a few other features of Markdown:
Paragraphs
Paragraphs in Markdown can be written exactly as you write them in Microsoft Word, but without a tabbed first sentence and with a blank line in between paragraphs. In other words, you can string together sentences one after another as you are used to doing when you write papers or emails, and they will appear in a paragraph on the front end of the webpage.
However, be aware that if you don’t put an empty line between your paragraphs when you write them in your essay-01.md file, they will all join into one massive paragraph on your “Essay In Progress” page.
For example, these two paragraphs have a blank line in between them, and will translate accordingly from the back end to the front end:
Back end view (essay-01.md):
Lorem ipsum dolor sit amet, consectetur adipiscing elit. Praesent maximus ex vitae odio condimentum molestie. Cras porta, metus non tempus pellentesque, odio libero porttitor lectus, vel eleifend enim enim cursus nibh. Mauris aliquam dignissim nunc eget viverra.
Duis in nisl in enim iaculis scelerisque. Ut congue ipsum nisi, nec ultrices nulla porta vel. In ultrices erat orci, in imperdiet dui tempor non. Nam placerat non ante nec viverra.
Front end view (“Essay In Progress”):
Lorem ipsum dolor sit amet, consectetur adipiscing elit. Praesent maximus ex vitae odio condimentum molestie. Cras porta, metus non tempus pellentesque, odio libero porttitor lectus, vel eleifend enim enim cursus nibh. Mauris aliquam dignissim nunc eget viverra.
Duis in nisl in enim iaculis scelerisque. Ut congue ipsum nisi, nec ultrices nulla porta vel. In ultrices erat orci, in imperdiet dui tempor non. Nam placerat non ante nec viverra.
But the following two sentences will merge into one paragraph when rendered on the front end, even though they are written on separate lines on the back end:
Back end view (essay-01.md):
Lorem ipsum dolor sit amet, consectetur adipiscing elit.
Praesent maximus ex vitae odio condimentum molestie.
Front end view (“Essay In Progress”):
Lorem ipsum dolor sit amet, consectetur adipiscing elit. Praesent maximus ex vitae odio condimentum molestie.
So, make sure to leave empty lines between your paragraphs, and between headings and paragraphs.
Now try it yourself
- Click the pencil button at the top right of your
essay-01.mdfile to open editing mode. - Underneath the new essay title that you just created, add two or three sentences of text (the subject can be anything, related or unrelated to your essay topic, this is just for practice).
- Scroll down to the bottom of the file and type a commit message into the “Commit changes” text box.
- Click the green “Commit changes” button to save your changes.
- Head over to where you opened your “Essay In Progress” page in a different tab or window.
- Wait a minute or two, then refresh the “Essay In Progress” page.
- Once you refresh your site, you should see your new sentences.
- The updates may take a few seconds to a few minutes to appear, so hold tight and keep refreshing if you don’t see them right away.
Font styles
To make a word or phrase italic, add one asterisk before and after that word or phrase, like this: *example phrase*.
The asterisks won’t be visible on your webpage, but your text will appear italicized.
To make a word or phrase bold, add two asterisks before and after that word or phrase, like this: **example phrase**.
Again, the asterisks won’t be visible on your webpage, but your text will appear bold.
Hyperlinks
To link to another page or site, insert the link title (what you want displayed to the site visitors) into square brackets, followed by a URL in parentheses:
[GitHub Help](https://help.github.com/) in your essay-01.md file will look like GitHub Help on your “Essay In Progress” webpage.
Lists
You can create lists in two different ways:
A bullet list is created using a hyphen (-) in front of each bullet point:
- dog
- cat
- muffin
A numbered list is created using a number followed by a period (.) in front of each list item:
- one
- two
- three
- four
Now try it yourself
- Click the pencil button at the top right of your
essay-01.mdfile to open editing mode. - Underneath the new sentences you just added, add some italic and bold text, a hyperlink, and either a bullet list or numbered list.
- Scroll down to the bottom of the file and type a commit message into the “Commit changes” text box.
- Click the green “Commit changes” button to save your changes.
- Head over to where you opened your “Essay In Progress” page in a different tab or window.
- Wait a minute or two, then refresh the “Essay In Progress” page.
- Once you refresh your site, you should see your changes.
- The updates may take a few seconds to a few minutes to appear, so hold tight and keep refreshing if you don’t see them right away.
As you practice adding content to your essay-01.md file, you can delete much of the content that was pre-added to the file if you’d like, except for the frontmatter at the very top (looks like this):
---
title: Essay 1
layout: about
permalink: /essay-01.html
---
Also do not delete the line of code that comes after the frontmatter, which looks like this: {% include feature/nav-menu.html sections="Introduction;Conclusion;Notes" %}.
We’ll discuss this line in more detail next week.
Otherwise, you’re welcome to delete or simply ignore the other content already in the essay-01.md file for now.
You’ll notice that there are some Markdown formatting options present in essay-01.md that we didn’t cover in our Lab this week, but we will get to those next week.
Step 4. Name topics
Remember our discussion of topic modeling that we had back in Lab 2? We’re going to apply that knowledge this week!
Your instructors prepared each of our text corpora (20th-century State of the Union texts and Party Platform texts, respectively) by uploading them into a topic modeling tool, which analyzed and clustered groupings of words based on the probability that they share a similar “theme” or “topic.” We’ve included the outputs of this analysis in this repository, for you to label and visualize.
Follow this process to label (or “name”) some of these topics:
- Make sure your GitHub repository is still open in one browser tab/window, and your project website is still open in another tab/window.
- Navigate to the homepage of your GitHub repository by clicking on the <> Code tab above your repository files.
- Locate and click on the “_data” folder in your repository (should be near the top of your repository files).
- Once inside the “_data” folder, click on the “topics” folder.
- Inside the “topics” folder are a series of spreadsheets, each containing topics for a specified subset of documents in our corpora.
A description of each spreadsheet and its corresponding filename are listed in the table below:
| Description | Filename |
|---|---|
| Party Platforms from the 20th century | party-platforms-20th-century-all-topics.csv |
| Democratic Party Platforms from the 20th century | party-platforms-20th-century-democratic-topics.csv |
| Republican Party Platforms from the 20th century | party-platforms-20th-century-republican-topics.csv |
| Party Platforms from 1900-1944 | party-platforms-1900-1944-all-topics.csv |
| Democratic Party Platforms from 1900-1944 | party-platforms-1900-1944-democratic-topics.csv |
| Republican Party Platforms from 1900-1944 | party-platforms-1900-1944-republican-topics.csv |
| Party Platforms from 1948-2000 | party-platforms-1948-2000-all-topics.csv |
| Democratic Party Platforms from 1948-2000 | party-platforms-1948-2000-democratic-topics.csv |
| Republican Party Platforms from 1948-2000 | party-platforms-1948-2000-republican-topics.csv |
| State of the Union Addresses from the 20th century | sotu-20th-century-topics.csv |
| State of the Union Addresses from 1900-1945 | sotu-1900-1945-topics.csv |
| State of the Union Addresses from 1946-2000 | sotu-1946-2000-topics.csv |
Continue following these instructions to open and edit one of these files:
- In the “topics” folder, locate the State of the Union 20th century file (
sotu-20th-century-topics.csv), and click on it. (Note: If this is the second half of the semester and you’ve already labeled topics for the State of the Union 20th century file, either pick a different file or consider if there are any topics you’d like to rename in thesotu-20th-century-topics.csv, now that you are further into this course and presumably have a more nuanced understanding of 20th-century history). - Take a look at the “words” and “topicname” columns in this spreadsheet. Each “words” cell contains 10 words that our topic modeler has determined fit together in a topic, but it’s up to us to determine what that topic should be called.
- Your instructors have already named four of the topics, by adding labels for those topics to the “topicname” column: “labor in America,” “American economy,” “America as world power,” and “America at war.”
- Now it’s your turn to name or rename some (not all!) of the topics in this spreadsheet. You’re welcome to stick with the topic names your instructors picked, but if you understand those topics differently, you’re also welcome to change their names. This is an inherently subjective process! Some names for topics in this spreadsheet might seem very obvious to you, while other topics contain words that don’t seem to have any similarities at all. You don’t need to name every topic in this spreadsheet, but you should spend some time seriously thinking about them, and when you’re ready to name or rename at least three topics in this file, continue on to the next step.
- Click on the pencil button to edit this file.
- When you click on the pencil button, you’ll notice that the spreadsheet changes form!
- Now, instead of the cells we typically see in a spreadsheet, each column of information is separated by commas. That’s because this is a “CSV” file (remember the file extension?
.csvat the end ofsotu-20th-century-topics.csv), and CSV stands for comma-separated-values. - The very first row in this CSV contains the column titles, and looks like this:
topic,tokencount,words,topicname. You should not edit this row! The ten rows below this row are available for you to edit, following the directions laid out in the next step.
- Now, instead of the cells we typically see in a spreadsheet, each column of information is separated by commas. That’s because this is a “CSV” file (remember the file extension?
- To name a topic, add the topic name after the very last comma in a row. For instance, the first topic in this spreadsheet is made up of the words,
law country made government service navy commerce officers proper duty. To name this topic, you’ll need to type your topic name after the comma that comes after duty, so if your topic name were “Example Topic,” it would look like this:
topic,tokencount,words,topicname
0,45231,"law country made government service navy commerce officers proper duty",Example Topic
In the example above, “Example Topic” has now been added to the “topicname” column.
If you want to replace a topic name that already exists instead of adding a new one, look for the topic name you want to edit (such as “labor in America,” or “American economy”), delete it, and add your new topic name in its place. Make sure that you don’t delete the comma that preceeds it–there should be a comma separating a topic’s words and a topic’s name.
Remember, the only thing you’ll be editing in this file are the topic names, not the words in the topics themselves.
Now that you’re in editing mode, add or edit at least three topic names, then scroll to the bottom of the page, add a commit message, and press the green “Commit changes” button to save your changes.
Proceed to the next step to discover how to visualize the topics you’ve just named.
Step 5. Visualize your topics
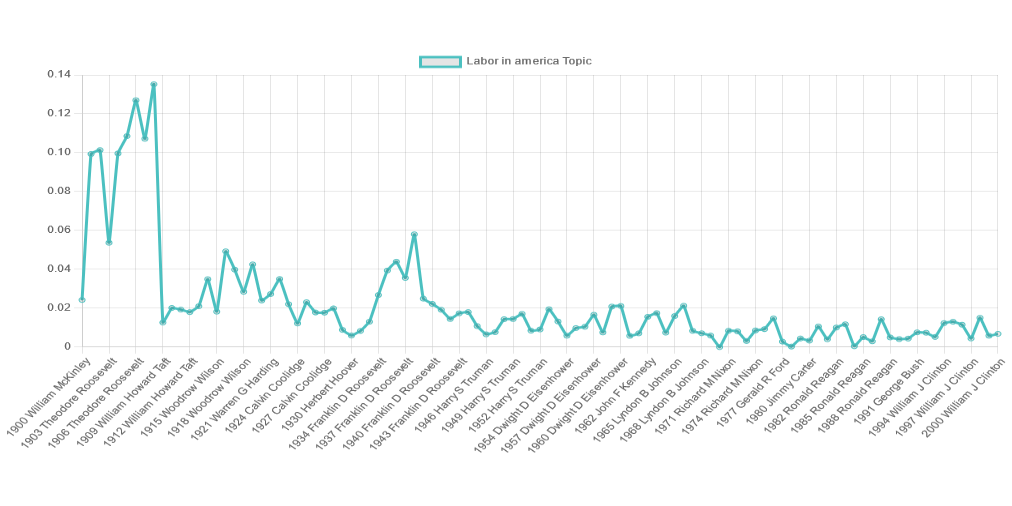
When we topic model a collection of texts, we not only get a set of topics (like the one we just looked at!), but we also get some data that shows how much a topic appears in a specific text.
So, once we’ve determined that we think a topic should be named “labor in America,” for instance, we want to know who talks the most about “labor in America” out of all of our 20th-century State of the Union Addresses.
This is most easily visualized using a line graph that shows a topic’s percentage in each document. Your website will automatically generate a line graph just like this for every topic that you name:
Follow these steps to check out the graphs that were created for the topics you just named:
- Navigate to your website (front end).
- In the navigation bar for your website, locate and click on the label Topic Visualizations.
- A dropdown list will appear. Select “State of the Union 1900-2000.”
- This takes you to the visualization page for “State of the Union Addresses, 1900-2000.” After the title and description, the first thing you’ll see is a table listing all of the topics you’ve named, along with the ten words that make up each of those topics.
- Scroll down the page a bit until you see a section titled “Line Chart.” Below the words “Line Chart” you’ll see the title of the data you’re using (in this case, “State of the Union 20th century”). Then, you should see a topic name in bold, followed by that topic’s words. Below the topic name is the graph of that topic.
- On the line graph, the x-axis represents each president’s speech and the year they gave it, while the y-axis communicates percentage (0.02 = 2%, 0.10 = 10%, and so on), and each point on the graph represents the percentage that the topic appears in a document. Hover over a point with your mouse to see what year and which speaker that point represents, as well as the percentage of the topic’s presence in that speech.
- All of the line graphs work in this same manner, so scroll down the page to view the graph for each of the topics you’ve named.
- Do the topics peak/dip over time as you expect them to?
- Do you notice anything surprising about a particular topic?
- Are there any topics you’d like to rename?
Spend as much time exploring the State of the Union topics and graphs as you’d like, then click back over to your browser tab or window that contains your GitHub repository, navigate back to the “topics” folder, and follow these steps:
- Once in the “topics” folder, locate the Party platforms 20th century file (
party-platforms-20th-century-all-topics.csv), and click on it. Your instructors have added a few topic names to this file, just as they did with the State of the Union 20th century file. - As you did with the State of the Union topic CSV, select the pencil button to edit this file, and name or rename at least three topics by adding the topic names after the last comma in a row.
- Don’t worry if you don’t think your topic name matches the topic words exactly, at this point this is just an exercise to get you thinking and hopefully inspire some questions about your research topic or what you’re learning in this class.
- Once you’re ready to view the topics you’ve named, add a commit message and press the green “Commit changes” button at the bottom of the file, then wait a minute, and navigate over to your website to click on the Topic Visualizations tab and select “Party Platforms 1900-2000.”
- Your new topics should appear as graphs on this page.
- If you don’t see them right away, wait a minute or two then refresh the page and your changes should appear.
The steps above can seem complex when you’re working through them for the first time. If you’d like a visual demonstration of how to name topics, visualize them, and add a graph to your essay page, watch the video below:
Step 6. Explore topics for the first half of the 20th century
Since your Essay In Progress will be focused on the first half of the 20th century, your instructors have prepared some additional topics for you to explore, using only State of the Union Addresses and Party Platforms from 1900 to the 1940s.
You can find these topic files in the “topics” folder, and you can edit them just as you did the full 20th-century topics above, then view their graphs on your website.
The only difference is your instructors did not pre-name any topics in these files for you, so its up to you to determine some topic names!
Choose at least one of the files listed below, and name at least two topics in that file, then look at the resulting line graphs on your website, following the steps outlined above for the 20th-century data.
| Description | Filename |
|---|---|
| Party Platforms from 1900-1944 | party-platforms-1900-1944-all-topics.csv |
| Democratic Party Platforms from 1900-1944 | party-platforms-1900-1944-democratic-topics.csv |
| Republican Party Platforms from 1900-1944 | party-platforms-1900-1944-republican-topics.csv |
| State of the Union Addresses from 1900-1945 | sotu-1900-1945-topics.csv |
Step 7. Final Activity
Explore all of the line graphs that you’ve generated, either from the 20th-century data sets or from the 1900-1944/45 data sets, and select one topic’s graph that is especially interesting to you.
Look immediately underneath that graph, where you should see a section titled “Include Code” in bold, followed by a bracketed line of pink text, similar to this:
{% include feature/line-chart.html data="party-platforms-20th-century-all" topic="freedom and prosperity" %}
Copy the pink text (brackets and all) and paste it two lines below the title in your essay-01.md file.
This pink text is called an “include” and is a handy way to add any graph into your multimedia essay.
You’ll be adding in images and pdfs using includes, too, but we’ll cover those next week.
Underneath the include that you just pasted into your essay-01.md file, add two or three sentences that explain why this particular topic graph is interesting to you and/or relevant to your essay topic.
Make sure to add a commit message and push the green “Commit changes” button to save your changes, then view the graph and your new sentences on the Essay In Progress page on your website (remember you’ll need to wait a few seconds and refresh the page to see your changes).
Paste a link to your Essay In Progress page as your response for this week’s Lab Discussion.
Nice work! This was a long Lab but you powered through. If you have questions or something’s still not working correctly, contact Professor Wikle.