Introduction to GitHub
Goals: Create a GitHub account; follow the instructions to create and edit a GitHub repository
Estimated Time to Complete: 45 minutes
For the digital portion of this course, we’re going to be using the web platform GitHub to store files and create a website. Please follow the instructions below for a quick introduction to GitHub.
Before we get started, let’s clarify some terms:
Git is a popular free, distributed version control system–i.e. a piece of software used to track the history of changes in a folder of files. Git can be used on your personal computer, or by online services to track the development of a project, such as…
GitHub, a popular web platform for hosting Git repositories–i.e. a place to store and sync your project files online. Think of it as Google Drive for code with super robust “track changes” baked in. Built around the powerful version control of Git, it provides a handy web interface for managing, editing, and collaborating on repositories.
Step 1. Create a GitHub account
- Go to https://github.com
- Click the “Sign up” button
- Enter your email and create a username and password to complete the sign up process
- You’ll be logging into GitHub to work on your digital project throughout this course, so be sure to remember your password.
Step 2. Copy a GitHub Repository
As a GitHub user, you will edit and create content on GitHub within repositories, or folders that store projects’ files and record changes to files over time.
Follow this link to see what a GitHub repository page looks like: https://github.com/learn-static/foundations-0-github
The multimedia essay you produce for this course will be produced in a GitHub repository!
Luckily, when you create a repository you don’t always need to start from scratch. You can also easily copy others’ code and add to it. This is what we’ll be doing for your multimedia essay.
For practice, follow the instructions below to copy all the files in a repository to your own GitHub account.
- Make sure you’re logged into your account on GitHub
- Head over to this foundations-0-github repository and locate and click on the green “Use This Template” button (appears on the top right side of the screen above the code area)
- This brings you to a “Create a new repository” form. Follow these steps:
- In the Repository name text box, give your repository the name
github-foundations. If you’d like to create your own name for the repository instead, be sure to use a lowercase name without spaces or odd characters. Dashes (-) or underscores (_) are okay. - In the Description text box, add
A place to learn GitHub basics. - Select the option for “Public” repository.
- Leave the “Include all branches” option Unchecked!
- Click on the green button “Create repository from template”. This will take you to your new repository.
- In the Repository name text box, give your repository the name
Step 3. Edit a README File
Explore your new repository. It contains:
- a folder of images
- a README file
- an “intro-github” file with instructions for this lesson
- Click on the
README.mdlink. This will open your README file.

The README file is a place to describe your repository. By default, GitHub displays the README on the repository home page, so it is often the first place visitors will look for information about your project.
- In the top right corner of the README file, locate and click on the pencil icon.
You are now in GitHub’s editing mode.
The first line at the top of the file will look like this:
# foundations-0-github
- Delete this line of text and instead type
# My Project. - Proceed to the following section to learn how to save or “commit” your changes.
Step 4. Make a Commit
When you make a commit, Git takes a snapshot of the changes you made and permanently stores it in your repository’s history. Your “commit message” is a short description of what the changes do or why you made them–this is your note to the future to help everyone understand the code and history.
- To commit the changes you just made to your README file, scroll to the bottom of the page where you made your README edits. You’ll see a box titled “Commit changes.”
- In the text box directly underneath “Commit changes,” type
update project title, or a brief message of your choosing that indicates what changes you made to this file. - Skip the option to add an extended description to the commit, and keep the box checked next to “Commit directly to the main branch”.
- Click on the green “Commit changes” button. This will take you back to your repository’s homepage.
- Scroll down to the bottom of your repository to view the new title you added to the README file.
You can view recent commits on your repository’s homepage. Commit messages and their timestamps are located to the right of the repository files:

Step 5. View the Changes
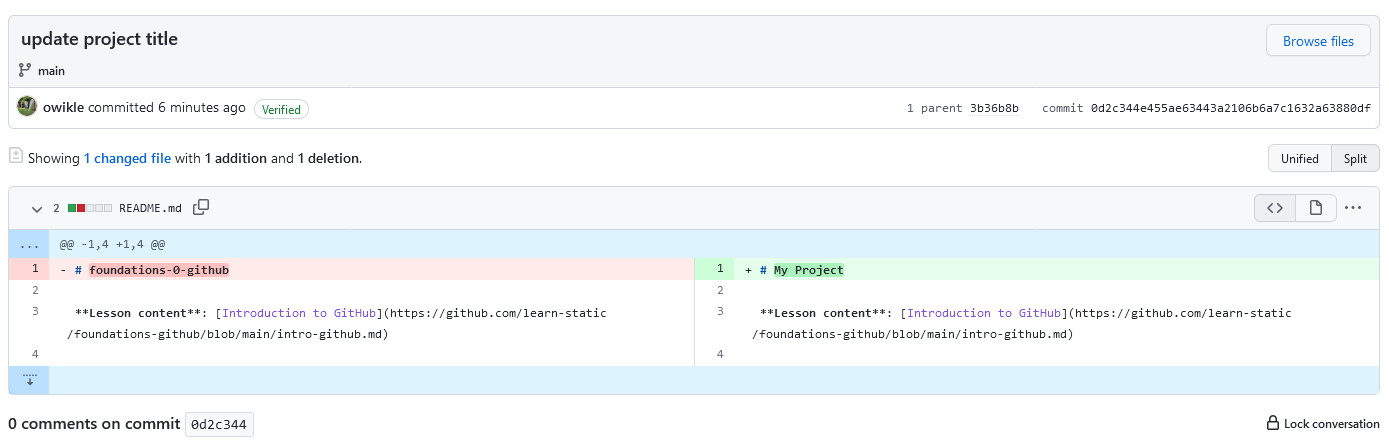
Let’s take a closer look at the changes you’ve made to the README file:
- On your repository’s homepage, locate the README.md file link. To the right of the link, you should see the commit message you just created (it should say
update project title). - Click on the commit message.
You should now see the changes you made to the README file: deleted content (in this case, the original text of your repository’s README file) will be highlighted in red, and new content (the text you added) will be highlighted in green. You may see the changes positioned one on top of the other (a red line above a green line, for instance), or side by side (with red, deleted content on the left side of the screen, and new content in green on the right). Either of these views is fine! But if you’d like to toggle between them to find the view you prefer look for the “Split” and “Unified” buttons positioned above the top right of the file, and click them to switch the layout.
- Click your repository’s name (located in the top left of the window) to return to the repository’s home page.
Step 6. Add a New File to the Repository
Now it’s time to add a new file to your project.
- On your repository’s home page, locate and click the “Add file” button, situated to the right above your repository’s files. When this button is clicked, a drop-down menu will appear. Select the option “Create new file”.
- An option to name your file will appear toward the top of your screen. Give your file the name:
new-file.txt - Add the following sentence to the body of your text file:
This is a new file in my GitHub repository.
- Commit your new file to your repository by adding the commit message
add new file(just as you did in the “Make a Commit” section above), and pressing the green “Commit new file” button. - Click your repository’s name (located in the top left of the window) to return to the repository’s home page.
Step 8. Show Your Work
Submit a link to the repository you just created to this week’s Lab Discussion.
To do this, make sure you are on the home page of the repository, then copy the URL for that page (it should look similar to this: https://github.com/owikle/learn-github), and paste it into the text box for this week’s Discussion on Canvas.