Including Images in Your Essay
Goals: Continue writing in Markdown; include images in essay
Estimated Time to Complete: 1 hour + 30 minutes
Last week we learned how to write in Markdown on our essay page, how to view the results of our topic modeling, and how to include topic graphs on our essay page. This week we’ll finish up learning about Markdown styling, and follow instructions to include images in our essay.
Step 1. Navigate to your project repository
- Log in to GitHub (https://github.com).
- Once you’re logged in, select the dropdown arrow in the very top-right corner of your browser window. Once you select this, a dropdown list should appear that starts with the words “Signed in as [your username].” On the dropdown, locate the link titled “Your repositories” and click on it. This will take you to your GitHub account and a list of all the repositories you’ve ever created.
- Locate the name of the repository you created for your class project, and click on it. This will bring you to your project repository and website, where you can continue editing files following the steps below.
Step 2. Open your website in a new browser tab or window
- In the “About” section of your repository homepage (the section to the right of the green “Code” button), locate the URL for your project site. Right click this URL and select either “Open link in new tab” or “Open link in new window.”
- NOTE: if you don’t see your URL listed in the “About” section, you’ll need to paste it into the “About” section manually. Follow these steps:
- On your project repository’s homepage, click the “Settings” button (appears on the right, towards the top of the page, just above the green “code” button).
- On the “Settings” page, locate the “Code and automation” section of the menu on the left.
- Under “Code and automation,” click on “Pages.” This will take you to a page titled “GitHub Pages.”
- On the “GitHub Pages” page, you should see a green box that contains a green checkmark followed by the words “Your site is published at [your URL].” Right click on the URL, and select the “Copy Link” option (this will copy the link for you so you can paste it into the “About” section on the homepage of your GitHub repository).
- Navigate back to the homepage of your GitHub repository by clicking on the “<> Code” tab above your repository files.
- On right side of the code area, to the right of the green “Code” button, look for the word “About”. Click the cog icon to the right of “About.” A box titled “Edit repository details” will pop up.
- In the “Edit repository details” popup, paste your URL into the “Website” section, then click the green “Save changes” button. This will post your URL below the “About” section on your GitHub repository’s homepage, making it easy to access the site in the future!
- While viewing your website, click on the “Essay In Progress” link in the navigation menu.
- Now you should have two tabs/windows open: one with your GitHub repository (the “back end” of your site) and one with your website (the “front end” of your site). You’ll need both of these tabs/windows open for the duration of this Lab, and you’ll work with both of them open in future Labs.
Step 3. More Markdown
Beyond paragraphs, headings, lists, and bold and italic font, there are a few Markdown elements that we still need to cover:
Citations
You’ll need to cite the sources for your multimedia essay just as you would for any academic essay. Remember you’ll be using Turabian Style to add your essay citations as footnotes.
To add a footnote in Markdown, directly after the sentence you’d like to cite, add a left square bracket ([), followed by a caret symbol (^), followed by a footnote number (i.e. 1, 2, 3, etc.), followed by a left square bracket (]). See below for an example:
Example text to be cited.[^1]
Yet more text to cite.[^2]
Then, at the very bottom of the page, you’ll create a section with the heading Notes, and add the bracketed footnote numbers (i.e. [^1], [^2], [^3], etc.), followed by a colon (:) and citation, like this:
[^1]: Katie Kitamura, *A Separation* (New York: Riverhead Books, 2017), 25.
[^2]: Sharon Sassler and Amanda Jayne Miller, *Cohabitation Nation: Gender, Class, and the Remaking of Relationships* (Oakland: University of California Press, 2017), 114.
On the front end of your essay page, your footnote number will automatically link down to the proper citation, which will reside at the “foot” of your essay.
To see this in action, look at the cited text below, and click on the blue 1 and 2 footnotes at the end of each line.
When you click on them, you’ll be taken to the Example Notes section at the bottom of this page.
Example text to be cited.1
Yet more text to cite.2
Now try it yourself
- In your GitHub repository, locate and click on the “pages” folder.
- Inside the “pages” folder, click on the file titled
essay-01.md. Then select the pencil button in the top right corner of theessay-01.mdfile to open editing mode. - Locate the sentences you wrote last week that describe your topic graph.
- At the end of one of those sentences (doesn’t matter which sentence, this is just for practice), add
[^1]. - Scroll to the bottom of the
essay-01.mdfile. - At the bottom of the file, add a heading 2 with the title “Notes,” like this:
## Notes(you may already have## Notesin your essay file. If it’s already there, just ignore this step!). - Two lines below the
## Notesheading, paste this citation:[^1]: John D’Agata, ed., *The Making of the American Essay* (Minneapolis: Graywolf Press, 2016), 19–20. - Notice the asterisks in the middle of that citation? Remember, they make the text look italicized on the front end of your webpage. You’ll probably use asterisks quite a bit in your citations, for book titles and journal titles!
- Scroll down to the bottom of the file and type a commit message into the “Commit changes” text box.
- Click the green “Commit changes” button to save your changes.
- Head over to where you opened your “Essay In Progress” page in a different tab or window.
- Wait a minute or two, then refresh the “Essay In Progress” page.
- Once you refresh your site, you should see your changes.
- The updates may take a few seconds to a few minutes to appear, so hold tight and keep refreshing if you don’t see them right away.
Horizontal Line Breaks
Sometimes you may want to add greater distinction between sections of your essay. You can do this by adding a “horizontal line break,” which is a horizontal line that stretches across the width of the page.
Horizontal line breaks are easy to do in Markdown. Simply add three hyphens in a row to a new line, and make sure the line with the hyphens is preceded and followed by blank lines, like this:
---
On the front end, a horizontal line break will look like this:
Opening hyperlinks in a new tab
Last week we learned how to create hyperlinks in Markdown, like this:
[GitHub Help](https://help.github.com/)
You probably noticed that hyperlinks created this way cause a new website to open in your browser’s current tab. Sometimes this is what you want to happen, but there will be other times where you’d like a link to open in a new browser tab when a user clicks on it. To make this happen, you’ll need to copy and paste the snippet of text below to the end of your hyperlink parentheses:
Copy this: {:target="_blank" rel="noopener"}
And paste it after the parentheses in your hyperlink:
[GitHub Help](https://help.github.com/){:target="_blank" rel="noopener"}
This will ensure that your link opens in a new tab, like this: GitHub Help
Now try it yourself
- Click the pencil button at the top right of your
essay-01.mdfile to open editing mode. - Scroll down the file to where you added the
[^1]after a sentence. - Two lines below the
[^1], add three hyphens:---. Make sure these are on a line by themselves, there should be no text on the lines directly preceding or following the line with the hyphens. - Two lines below the hyphens, add this hyperlink:
[GitHub Help](https://help.github.com/) - Then ensure it opens in a new tab by adding this text right after the parentheses in your hyperlink:
{:target="_blank" rel="noopener"} - Scroll down to the bottom of the file and type a commit message into the “Commit changes” text box.
- Click the green “Commit changes” button to save your changes.
- Head over to where you opened your “Essay In Progress” page in a different tab or window.
- Wait a minute or two, then refresh the “Essay In Progress” page.
- Once you refresh your site, you should see your changes.
- The updates may take a few seconds to a few minutes to appear, so hold tight and keep refreshing if you don’t see them right away.
Table of contents
If you break your essay into sections (example: Introduction, Conclusion, etc.), you can title each of those sections using headings. To do this, use the various heading sizes that we learned last week:
# Heading 1
## Heading 2
### Heading 3
You can have multiple headings of the same type throughout your essay, and nest headings hierarchically just as you would an outline, like this:
# First Heading 1

## First Heading 2

# Second Heading 1

## Second Heading 2
…which looks like this on the front end:
First Heading 1
First Heading 2
Second Heading 1
Second Heading 2
Remember, always separate a heading from the text below it with a blank line.
If you do incorporate headings, you’ll probably find it convenient to make use of the table of contents feature at the top of the essay.
The table of contents is generated from the line near the top of your essay-01.md file that looks like this:
{% include feature/nav-menu.html sections="Introduction;Conclusion;Notes" %}
If you don’t see that line, you may have deleted it from your file already. That’s okay! Just add it back in for now by copying and pasting this:
{% include feature/nav-menu.html sections="Introduction;Conclusion;Notes" %}
right above your essay title in your essay-01.md file.
Look closely at this line of text:
{% include feature/nav-menu.html sections="Introduction;Conclusion;Notes" %}.
Let’s call this the “Table of Contents Include.”
See the word “sections”?
“sections” is followed by an equals sign (=) and three words separated by semicolons and encased with quotation marks.
The three words inside the quotation marks correspond to headings in the default essay-01.md file:
## Introduction
## Conclusion
## Notes
Take a look at the front end of your essay page. Immediately underneath the navigation bar, there’s a box that contains the word “Contents” followed by the links “Introduction,” “Conclusion,” and “Notes.” Click on any of these links and your page will automatically scroll down to the specified section.
If it doesn’t scroll to the section, it might be because you’ve already deleted that heading from your essay.
In order for the contents box to work correctly, the word in the Table of Contents Include needs to match a heading somewhere in your essay.
Your heading just needs to be preceded by one or more pound signs (#) in order for this feature to work (it doesn’t matter how many pound signs).
Now try it yourself
- Back in your GitHub repository, click the pencil button at the top right of your
essay-01.mdfile to open editing mode. - Add a new heading by copying the following:
### My First Subheading, and pasting it into theessay-01.mdfile somewhere after the## Introductionheading but before the## Conclusionheading. - Locate the Table of Contents Include:
{% include feature/nav-menu.html sections="Introduction;Conclusion;Notes" %} - In the Table of Contents Include, add your new heading and a semicolon between the words “Introduction” and “Conclusion,” like this:
"Introduction;My First Subheading;Conclusion;Note" - Scroll down to the bottom of the file and type a commit message into the “Commit changes” text box.
- Click the green “Commit changes” button to save your changes.
- Head over to where you opened your “Essay In Progress” page in a different tab or window.
- Wait a minute or two, then refresh the “Essay In Progress” page.
- Once you refresh your site, you should see your changes.
- The updates may take a few seconds to a few minutes to appear, so hold tight and keep refreshing if you don’t see them right away.
You can add, edit, and delete as many headings in your Table of Contents Include as you’d like!
If you decide you’d prefer not to have a Table of Contents on your essay, you can simply delete this line:
{% include feature/nav-menu.html sections="Introduction;Conclusion;Notes" %}
from your essay-01.md file and it will disappear from the front end.
Step 4. Add an image to your essay
You may want to include a visualization from your Voyant Tools exploration into your multimedia essay.
Let’s practice exporting a word cloud from Voyant and including it into our multimedia essay following the steps below.
Start by choosing a corpus to view in Voyant from those listed below. When you’ve decided on one, click on the green “View in Voyant Tools” button to the right of it. This will take you to a new browser tab to explore that corpus in Voyant.
| Description | Voyant Link |
|---|---|
| Party Platforms from the 20th century | View in Voyant Tools |
| Democratic Party Platforms from the 20th century | View in Voyant Tools |
| Republican Party Platforms from the 20th century | View in Voyant Tools |
| Party Platforms from 1900-1944 | View in Voyant Tools |
| Democratic Party Platforms from 1900-1944 | View in Voyant Tools |
| Republican Party Platforms from 1900-1944 | View in Voyant Tools |
| Party Platforms from 1948-2000 | View in Voyant Tools |
| Democratic Party Platforms from 1948-2000 | View in Voyant Tools |
| Republican Party Platforms from 1948-2000 | View in Voyant Tools |
| State of the Union Addresses from the 20th century | View in Voyant Tools |
| State of the Union Addresses from 1900-1945 | View in Voyant Tools |
| State of the Union Addresses from 1946-2000 | View in Voyant Tools |
Remember, the word cloud appears in the top left section of the Voyant dashboard, and shows the raw frequency of the top-appearing words in our corpus.
Now expand the word cloud to full screen following these instructions:
- Hover your mouse just above the word cloud content, to the right of the “Links” button in the toolbar. Look for the icon of a box with an arrow pointing up and out of it. Click on this icon.
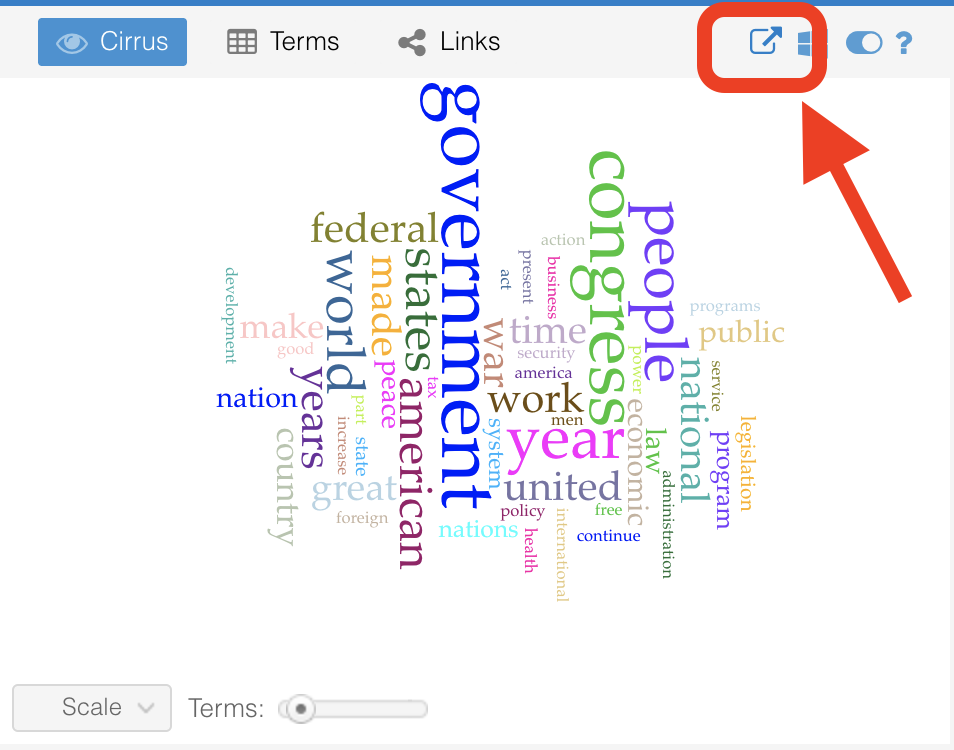
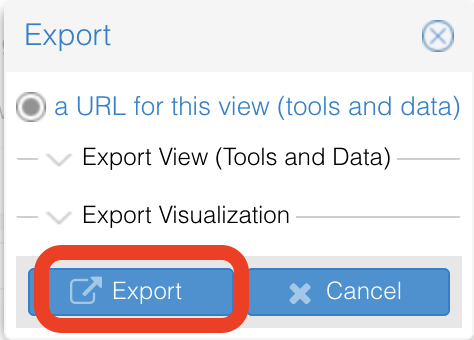
- A popup will appear with the Title “Export.” Without clicking on any other options in the popup, click on the blue “Export” button in the bottom left of the popup.
-
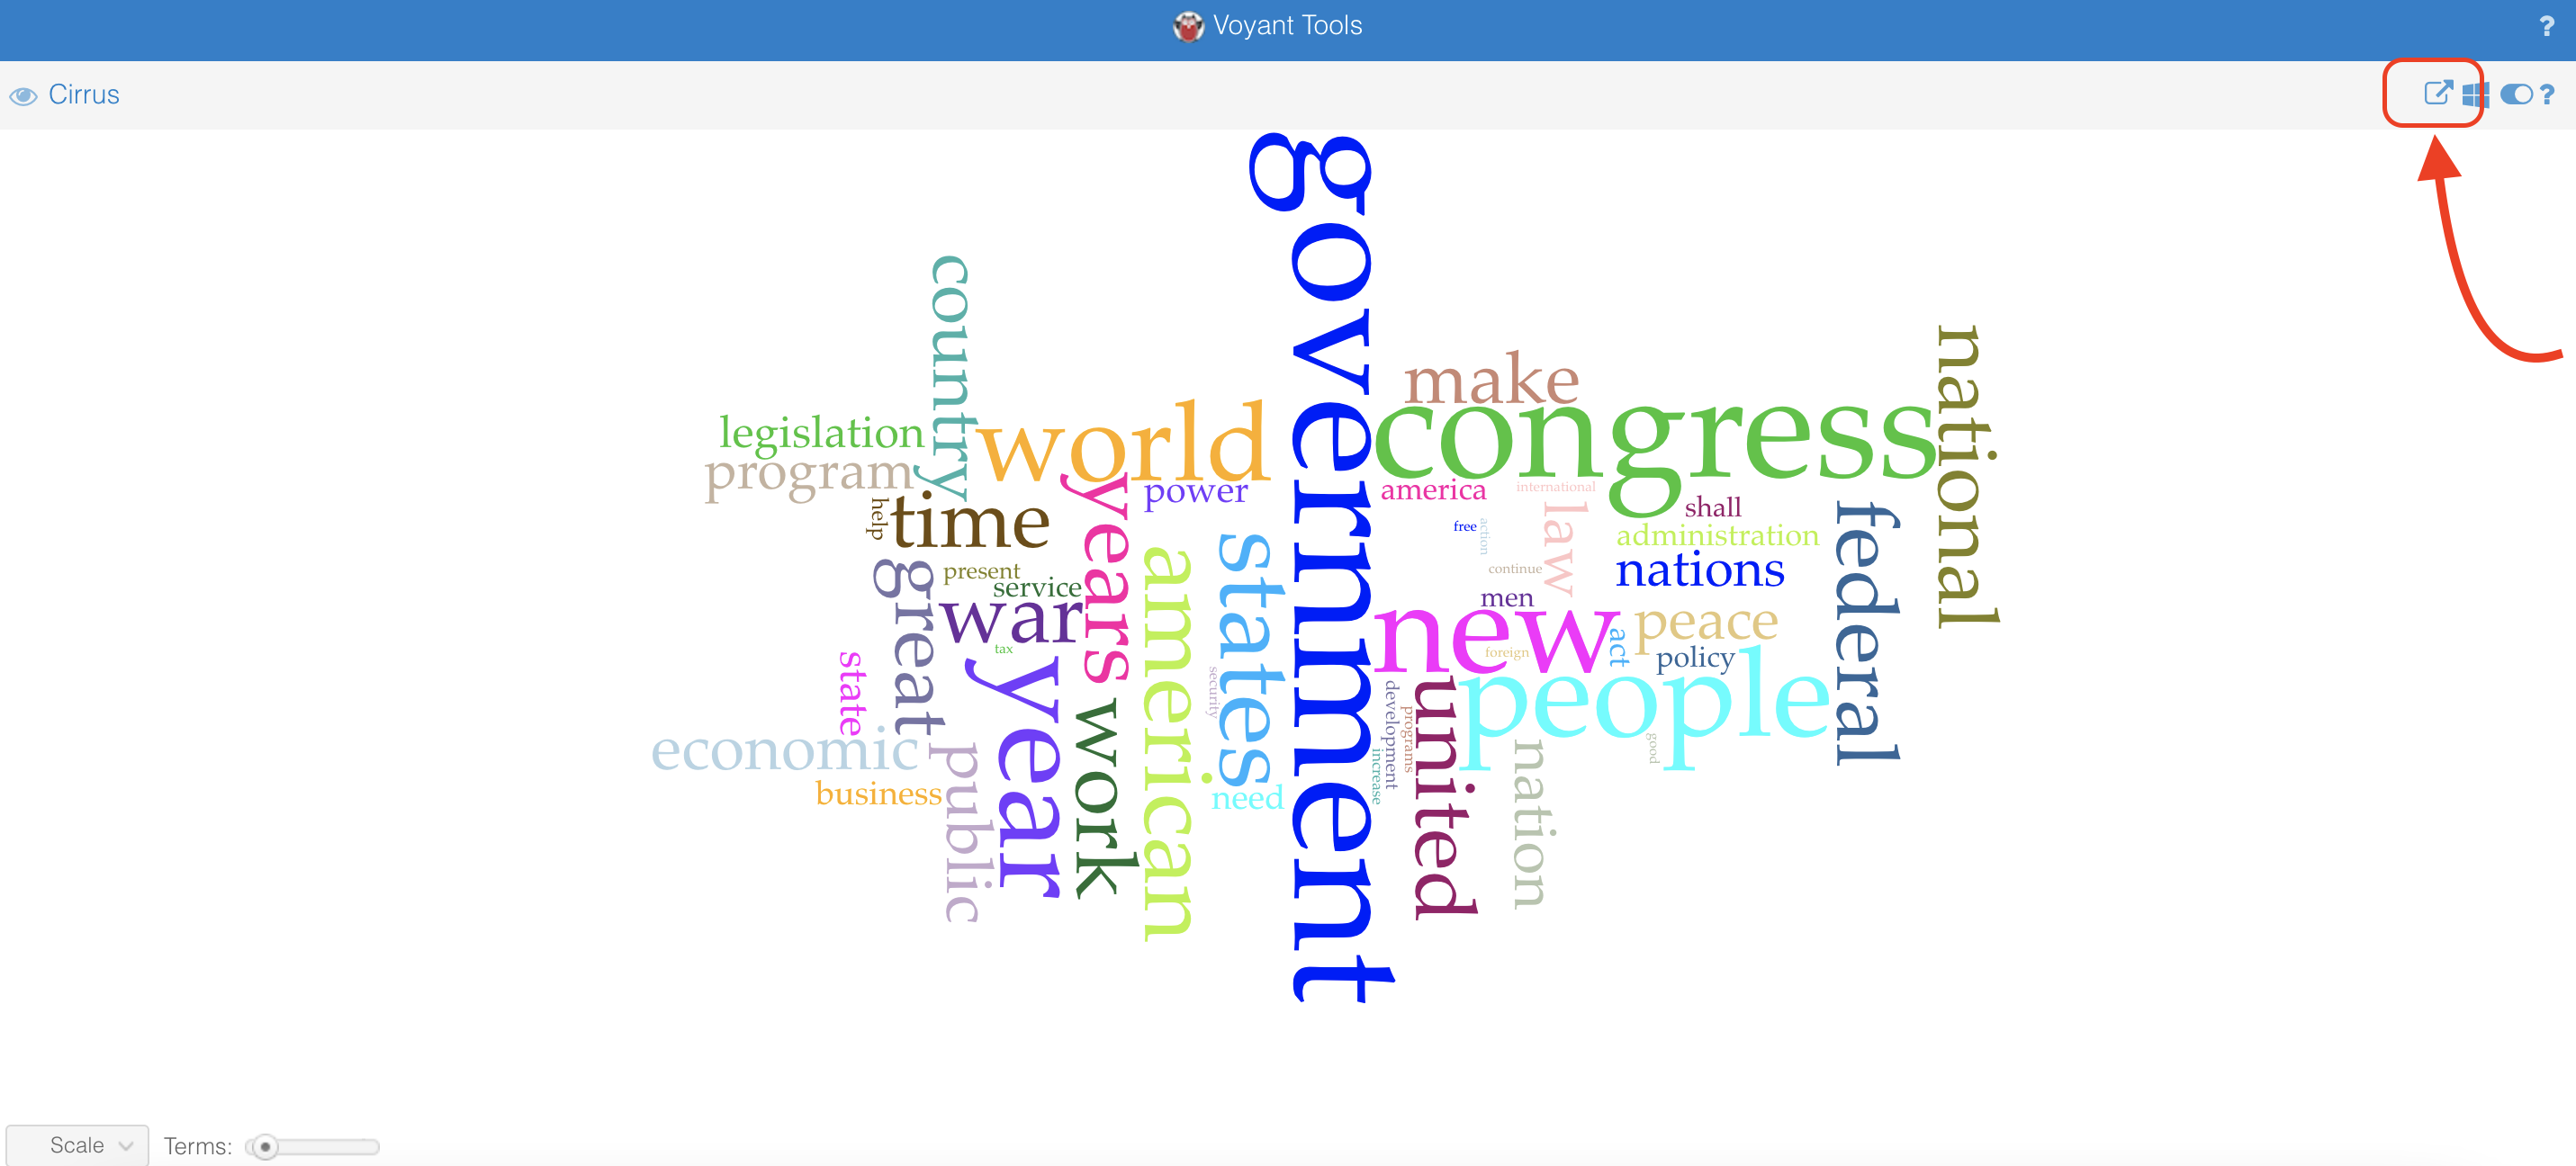
This opens up the word cloud as a full-screen visualization in a new tab in your browser. At this point, if you were doing this for your own research you would explore the word cloud using the Voyant settings that you learned in our Voyant lesson. We’re going to skip over the exploration for the sake of this tutorial and move right to exporting this image for use in our multimedia essay.
-
To export this visualization as an image, hover your mouse in the white toolbar (not the blue toolbar!) in the top right of the browser window. Look for the icon of a box with an arrow pointing up and out of it. Click on this icon.
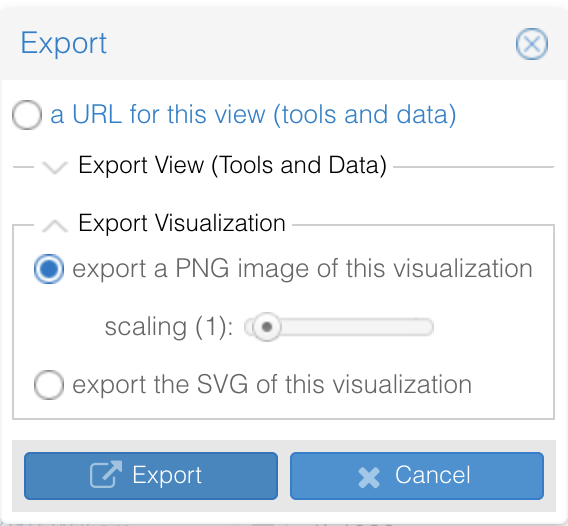
- When you click on the export icon, a popup will appear with the Title “Export.”
- There are two dropdown options within the popup box: “Export View (Tools and Data)” and “Export Visualization.” Click on “Export Visualization.”
- Two options will appear below “Export Visualization”: “export a PNG image of this visualization,” and “export the SVG of this visualization.” Select “export a PNG image of this visualization.” Then click the blue “Export” button in the bottom left of the popup.
Note: Some browsers may not display the dropdown options! If the “Export” popup does not show you any dropdown options, click the blue “Cancel” button in the bottom right of the popup, and then take a screenshot of your visualization instead. You can upload the screenshot file to your essay instead of an exported file, following these instructions.
- A popup will appear with the title “Export PNG.” A PNG is a type of image file. We want to save it to our computer and then upload it to our GitHub repository.
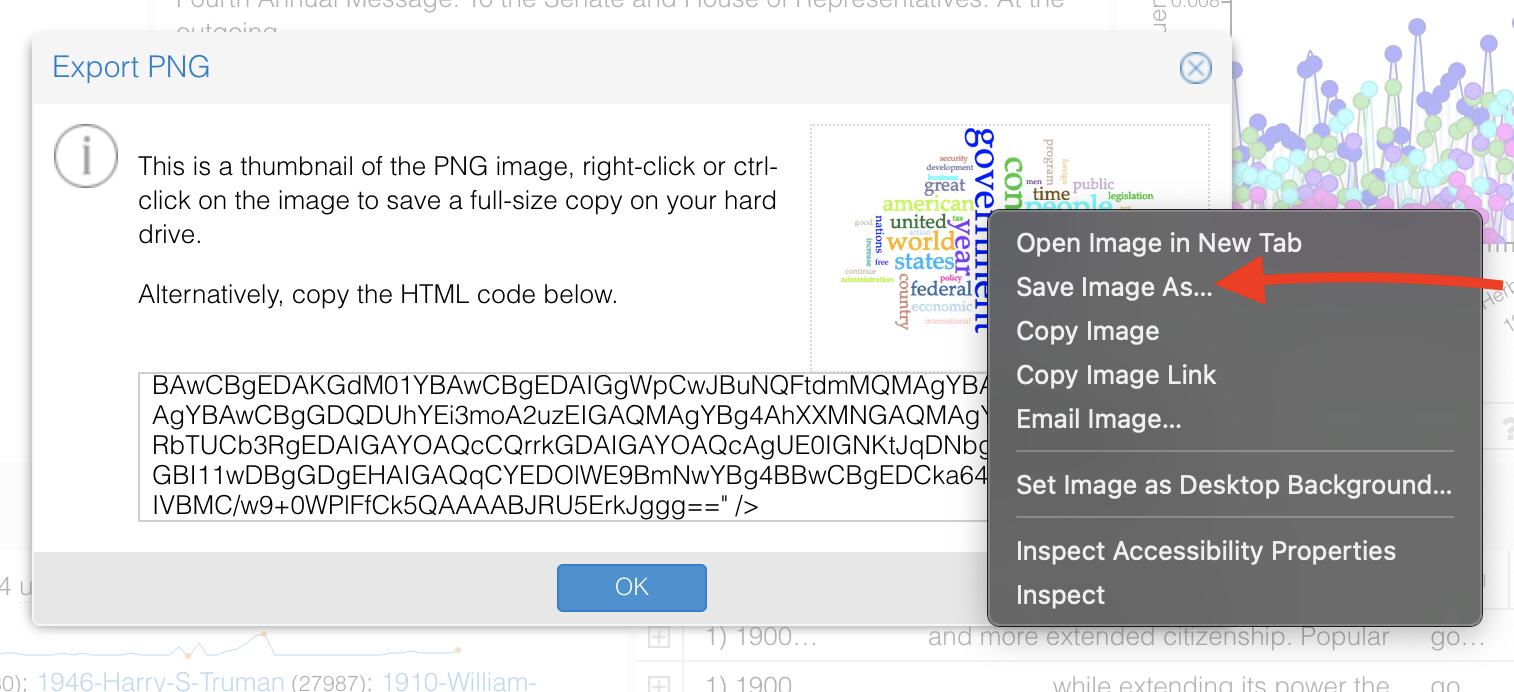
- On the right side of the popup, there is a preview of the word cloud. Right-click or press ctrl and click on the word cloud preview.
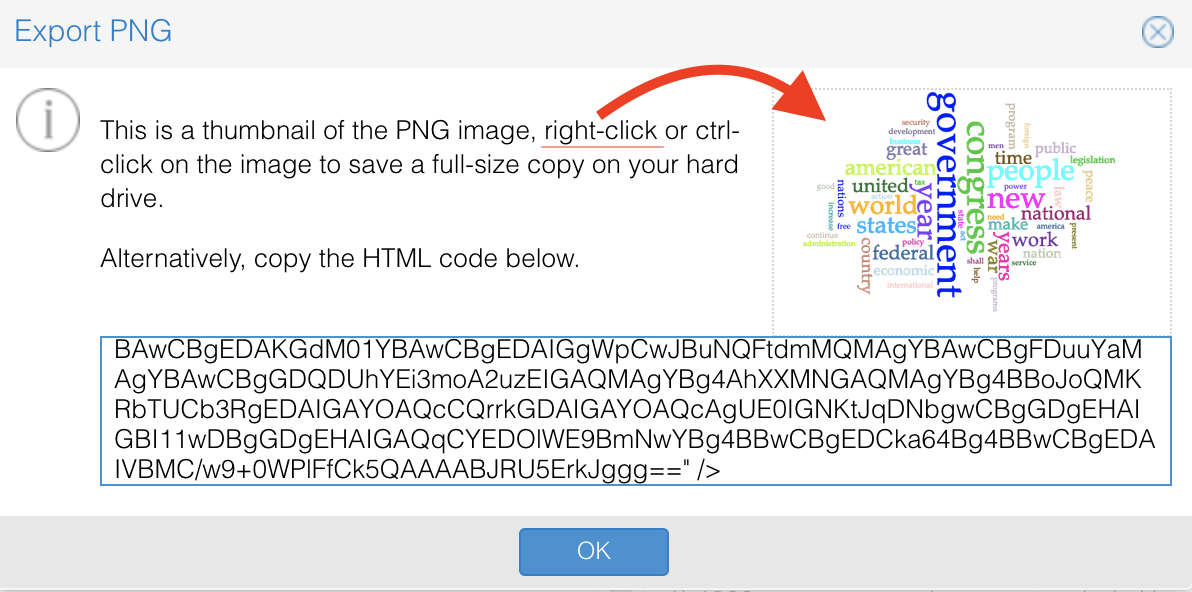
- This brings up a menu with several options, one of which is “Save Image As…”. Select “Save Image As…”
-
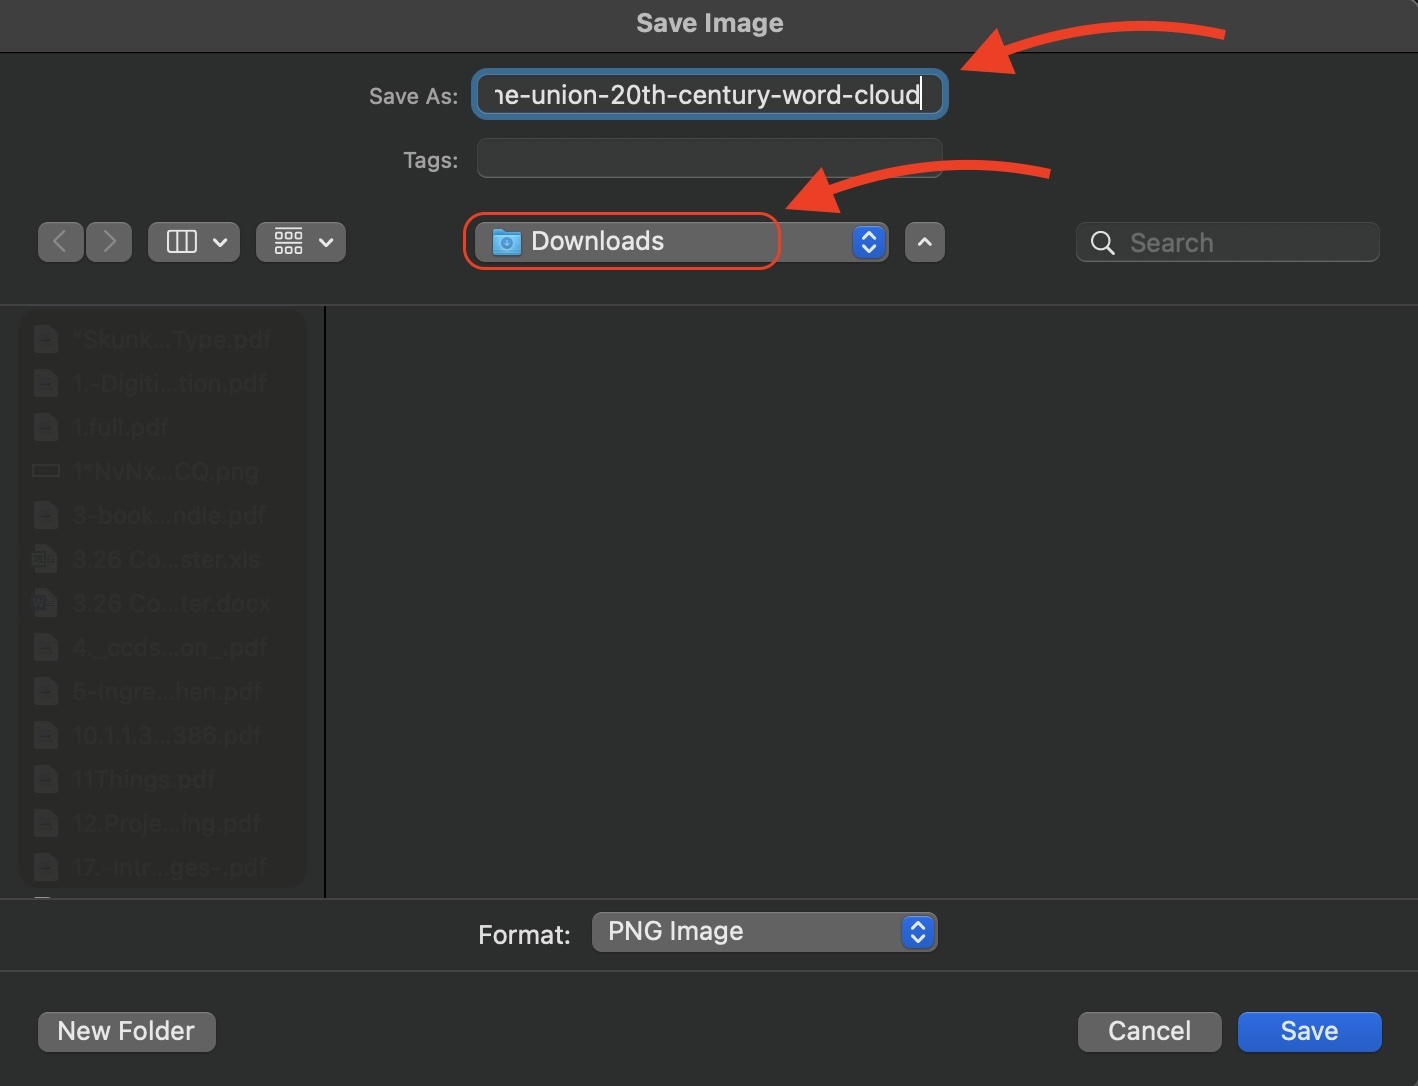
At this point you’ll need to give this image file a name. Avoid using spaces in your filename, instead separate words by hyphens (
-) or underscores (_). Try to be as specific with the name as possible, such as “party-platforms-20th-century-word-cloud,” so you don’t get confused later. -
After you’ve named it, pay attention to the location where you are saving this file. In most cases, your computer will automatically save things that you download in the “Downloads” folder, but it’s good to check to make sure. Leave the image format just as it is (PNG format for default), and click “Save.”
Great job! We’re almost there.
All that remains is to upload it to our GitHub repository and include it in our essay. Follow these steps:
Upload an image to the GitHub repository
- Make sure your GitHub repository is still open in one browser tab/window, and your project website is still open in another tab/window.
- Switch to the tab that holds your GitHub repository, and navigate to the homepage of your GitHub repository by clicking on the <> Code tab above your repository files.
- In your repository, locate and click on the “objects” folder (directly above the “pages” folder). There are already some demo files in this folder, and we’re going to add your new file to them.
- Towards the top right of the page (where the pencil button would normally be) locate the “Add file” button and click on it. This is a dropdown button that gives you two options: “Create new file” and “Upload files.” Select “Upload files.”
- This brings you to a page that says “Drag files here to add them to your repository or choose your files.” Click on the “choose your files” link. This will open up your File Explorer application (on a Windows machine) or your Finder application (on a Mac).
- In File Explorer/Finder, locate your Downloads folder (or the folder where you saved the PNG export from Voyant), and then locate the file you just exported and saved from Voyant Tools.
- Once you’ve selected the correct file, click the “Open” button in the bottom right of your File Explorer/Finder window. This will automatically trigger GitHub to upload the file.
- In order to finalize the upload, you’ll need to commit the change, so add a commit message to the “Commit changes” box at the bottom of the page, then click the green “Commit changes” button.
- After you commit the file, GitHub will automatically redirect you to the repository’s homepage. If you want to you can look inside your “objects” folder again to see the file you just uploaded, but this isn’t necessary.
The steps above can seem complex when you’re working through them for the first time. If you’d like a visual demonstration of how to upload an image to your GitHub repository, watch the video below:
Include an image on the multimedia essay
- Now switch to the browser tab that holds the “front end” of your project website.
- In the navigation bar, locate and click on “Include Generator.” We are going to use this form to generate an “include,” a snippet of text that will allow us to display images on our essays, just as we displayed topic graphs last week.
- In the middle of the “Include Generator” page, click on the dropdown that says “Select include type,” and select “image” from the dropdown options.
- Click on the Image filename dropdown. You should see the filename of the image you just uploaded to your GitHub repository as an option in the dropdown list! Select this file.
- The next field on the form that you’ll need to fill in is “Image alt text.” Besides selecting a file from the “Image filename” dropdown, this is the only other “required” piece of information that you’ll need to fill in before you submit this form; everything below it is optional.
- Why?: The reason it is required is because “alt text” makes the internet a more inclusive place for people with visual impairment, by allowing screen readers to describe images to them as they navigate the web. The “alt text” for an image lives in the HTML code for that image, on the back end of the website, so you won’t actually see the value you enter into this field anywhere on your essay page, but if you decide to make your essay public at the end of this project it will allow people with visual impairment to fully experience your site, images included.
- Guidelines: The value for “alt text” should be brief but descriptive text that identifies the image you’ve uploaded. For instance,
image of a word cloud generated from Party Platform texts from the years 1900-1944would be an appropriate value.
- Image caption is an optional field that allows you to add a brief caption underneath the image you are including. Keep your caption length to a sentence or less. In some cases–but not always–your caption may be very similar to the text that you added for the “alt text” value. If you don’t want to include a caption, simply leave this field blank.
- Image width is an optional field that allows you to control how big your image is displayed on your essay. You can choose from four values: 25%, 50%, 75%, and 100%. If you leave this field blank, your image will automatically display at 100%.
- Image link is an optional field that allows you to link back to the place where you found your image. In this case, you could add the URL for the Voyant Tools dashboard from which you downloaded the word cloud image. Note that an image link is not required for Voyant Tools screen shots, but it may be important to add links for future images that you obtain from other sources and which you’d like to add to your essay. So even if you don’t use the image link option in this tutorial, you may need to use it for other images that you include as you write your essay.
- Once you’ve filled in the desired fields in your form, click the blue “Submit” button at the bottom of the form. This will generate a box that appears beneath the form, titled “Include code,” and containing a line of pink “include” text that looks similar to this:
{% include feature/image.html filename="sotu-word-cloud.png" alt="image of a word cloud generated from corpus of 20th century State of the Union Addresses" width="50" %}
Copy all of the pink include text (brackets and all), then follow these steps to paste it into your essay-01.md file:
- Click over to the browser tab that holds your GitHub repository, and navigate to the homepage of your GitHub repository by clicking on the <> Code tab above your repository files.
- Locate and click on the “pages” folder in your repository.
- Inside the “pages” folder, locate and click on the
essay-01.mdfile. - Click the pencil button at the top right of your
essay-01.mdfile to open editing mode. - Create two new lines below the title of your Essay (not the title in the frontmatter, which is the content between three hyphens (
---) at the very top of your file. Your essay title should be a Heading 1–a title you created that starts with a single pound sign (#)) in youressay-01.mdfile, and paste the “include” text that you copied from your website. - Scroll down to the bottom of the file and type a commit message into the “Commit changes” text box.
- Click the green “Commit changes” button to save your changes.
- Head over to where you opened your website in a different tab or window, and use the navigation menu to switch back to the “Essay In Progress” page.
- Wait a minute or two, then refresh the “Essay In Progress” page.
- Once you refresh your site, you should see the new image appear below your essay title.
- The updates may take a few seconds to a few minutes to appear, so hold tight and keep refreshing if you don’t see them right away.
- Are you happy with how the image looks? Remember you can regenerate the include for this image with a different width and caption. Once you’ve generated the new include text, delete the include text that you just added into the
essay-01.mdfile and past the new include text intoessay-01.mdinstead.
The steps above can seem complex when you’re working through them for the first time. If you’d like a visual demonstration of how to generate an image include and add it to your essay, watch the video below:
Step 5. Activity
- Choose a dataset from the table above to view in Voyant, and use the skills that you learned in the Voyant lesson to find a visualization that could be useful supporting evidence for your research topic.
- When you’ve settled on a visualization, follow the steps above to export the visualization from Voyant, add it to your GitHub repository, generate an include for it, and paste the include text into your
essay-01.mdfile. - For this week’s Lab Discussion, in a few sentences please describe this Voyant image that you included in your essay, and why you included in. Also add a link to your multimedia essay page to your discussion response.
Looking Ahead
Now that you’re getting to a point where you’re ready to start writing your essay, here are a couple of tips for getting started:
- If you want to, you can draft your essay using a word processor like Microsoft Word, Libre Office, or Google Docs, and paste the text from that document into your
essay-01.mdfile. Do note that you will need to do some work after you paste it to make sure that your visualizations are added, that you’ve translated your word processor’s styling (bold, italics, hyperlinks, bullet points) into Markdown following the instructions from this week’s lab and last week’s lab, and that you’ve added your citations in Markdown following the instructions above. - Right now your
essay-01.mdfile is probably looking pretty cluttered. You can delete most of it, but not all of it! Follow these instructions to find out what you should keep in youressay-01.mdfile as you start clearing out the clutter and crafting your essay. - Are you interested in including non-Voyant images and PDFs in your essay? This isn’t required for your Essay In Progress, but now that you know how to add a Voyant image, you can add any other image or PDF following the same workflow! We’ll discuss this in more detail during the second half of the semester, but take a look at this Image Resources section for more information in the meantime.
One last note: These last couple of Labs were difficult and complex, so thanks for sticking with them! The good news is that now you know everything there is to know about creating your multimedia essay! You won’t be learning any new skills from here on out; instead, you’ll be working on applying these skills to actually write your essay. And if you don’t feel completely comfortable navigating the multimedia essay-writing process yet, don’t worry! These processes get a little easier every time you do them, so by the end of the semester this process should feel easier to you.
As always, if you have questions or something’s not working correctly, contact Professor Wikle.